#How to install retropie dreamcast emulator
Explore tagged Tumblr posts
Visit Tumblr Blog
Explore Tumblr blogs with no restrictions, modern design and the best experience.
Last Seen Tumblr Blogs


Fun Fact
The Tumblr app for Google Glass was released on May 16, 2013.
Text
How to install retropie dreamcast emulator

How to install retropie dreamcast emulator for free#
How to install retropie dreamcast emulator how to#
How to install retropie dreamcast emulator software#
How to install retropie dreamcast emulator windows#
How to install retropie dreamcast emulator windows#
15 Windows Command Prompt (CMD) Commands You Must Know.
How to install retropie dreamcast emulator how to#
How to Track Downloads in Google Drive, Dropbox, and Box.
10 Reasons Why Brave Browser Is Becoming So Popular.
The Best Dark Web Browser for Your Device.
Deck the Halls With These 8 High-Tech Christmas Decorations.
How to install retropie dreamcast emulator for free#
6 Ways You Can Get a Microsoft Office License for Free.What Is OpenBSD? Everything You Need to Know.How to Add Name Pronunciation to Your LinkedIn Profile.What Are Bézier Curves in Computer Graphics?.
How to install retropie dreamcast emulator software#
The 5 Best Tools to Download Streaming Video From Any Website Here are the best apps and software for when you want to download videos from websites quickly and painlessly.how to emulate Amiga games on Raspberry Pi.RetroPie beta images for Raspberry Pi 3 B+.installing an operating system on the Raspberry Pi.While there remain a few Dreamcast games that won't play on the Raspberry Pi (see below), using a Pi 3 B+ will give you the best chance of being able to enjoy the Dreamcast gaming experience. The newer the Raspberry Pi model, the better, as superior hardware delivers more consistent results. You'll also need to ensure that you're using a Raspberry Pi 2 or 3 for the best results. However, it does run under RetroArch, of which RetroPie is a fork. This is because the emulator for Dreamcast games, Reicast, doesn't run with Recalbox. Raspberry Pi users have the option of two great gaming emulation suites: Recalbox and RetroPie.īut to play your favorite Sega Dreamcast games on a Raspberry Pi computer, you'll need to use the RetroPie image. Why You Need RetroPie to Emulate the Dreamcast Game controller (mine is an Xbox 360 USB controller).Raspberry Pi 2 or 3 ( I'm using a Raspberry Pi 3B+).Thanks for reading and watching, if you have any doubt comment me below i will like to give answers. Hope you enjoyed the tutorial, if missed something in this article give your feedback in the comment section i will fill that point. So you learned how download game roms to the retropie and how to install, one more website i want to include, check it here. Thanks for watching this video if you want to buy the items shown in video check video’s description for links. How to Build Retro GAME CONSOLE with RPi 3 B+ & Retropie I found it have good ratings and contains mega roms collection. Find link in next Paragraph.ĭownload game roms for all the platforms like Playstation, Nintendo entertainment system, SNES, Nintendo64, Mame, NeoGEO, SEGA, Atari etc from this Game Roms website. There is a Website which is trusted by many people and its safe too. Do not download any illegal roms from untrusted sites, otherwise the will may put malware to your device. Ask your friend if they have some or you can search google for roms. How and where to Download Game Roms for Retropie ?įor the copyright reasons and some other reasons retropie website do not serve any game roms on there website, you have to find game roms yourself. Step 7 : Start your Raspberry pi and you will see the emulators and games are now showing in the retropie. Step 6 : Now keep your Raspberry pi turned off, insert the USB drive to Pi. Step 5 : Copy the roms to their respective emulator folders (in the retropie/roms folder) Step 4 : After waiting take out the USB drive and plug it into a computer. Step 3 : Then plug it into the pi and wait for 2 or 3 minutes, retropie will create some folder and setting to your USB drive. Step 2 : Now create a folder on your flash drive and rename it to “retropie” Step 1 : Insert a empty flash drive to your computer or format your Flash drive using sdcard formatter in FAT32 File system. Now let’s see how to get ready your USB drive to be able to transfer the ROMs: You can use any flash drive but it must be in a fat32 partition format. You will need a USB drive to add ROMs and a computer. To add game ROMs to Retropie there are three options, but in this article I will show you the easy one. This is a Linux based operating system and its also called best Gaming os for playing retro games of the ’90s. Retropie also has a service REtro ARCH which allows you to connect and play other computers. You can download 1000+ retro game ROMs below in the article. Installing the Retropie you will need to configure your gamepad first then you have to add game ROMs on it. You can download this operating system for free in Retropie website. Retropie is an Operating System for ARM boards like Raspberry pi, to emulate games from multiple gaming platforms.
0 notes
Text
My Homelab/Office 2020 - DFW Quarantine Edition
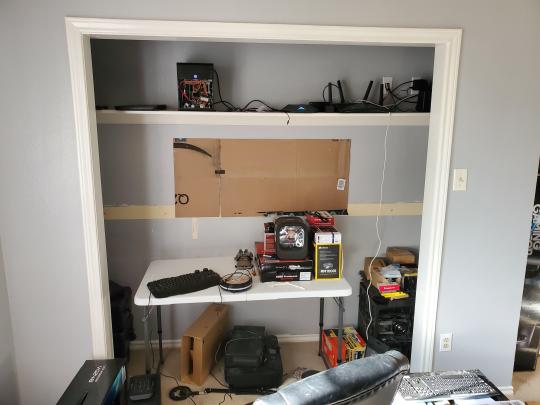
Moved into our first home almost a year ago (October 2019), I picked out a room that had 2 closets for my media/game/office area. Since the room isn't massive, I decided to build a desk into closet #1 to save on space. Here 1 of 2 shelves was ripped off, the back area was repainted gray. A piece of card board was hung to represent my 49 inch monitor and this setup also gave an idea how high I needed the desk.
On my top shelf this was the initial drop for all my Cat6 cabling in the house, I did 5 more runs after this (WAN is dropped here as well).
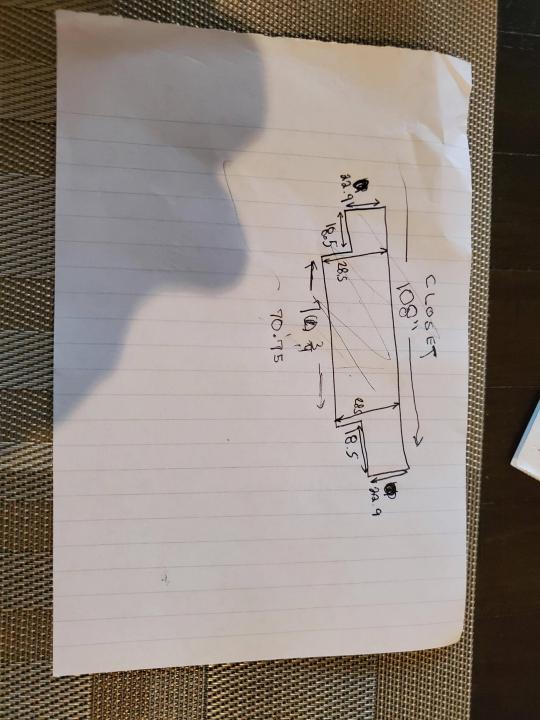
I measured the closet and then went to Home Depot to grab a countertop. Based on the dimensions, it needed to be cut into an object shape you would see on Tetris.
Getting to work, cutting the countertop.
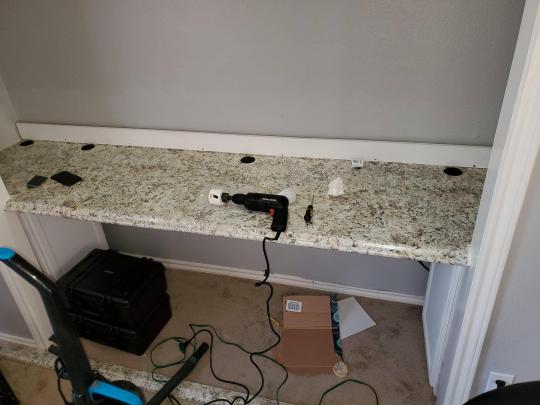
My father-in-law helped me cut it to size in the driveway and then we framed the closet, added in kitchen cabinets to the bottom (used for storage and to hide a UPS). We ran electrical sockets inside the closet. I bought and painted 2 kitchen cabinets which I use for storage under my desk as well.
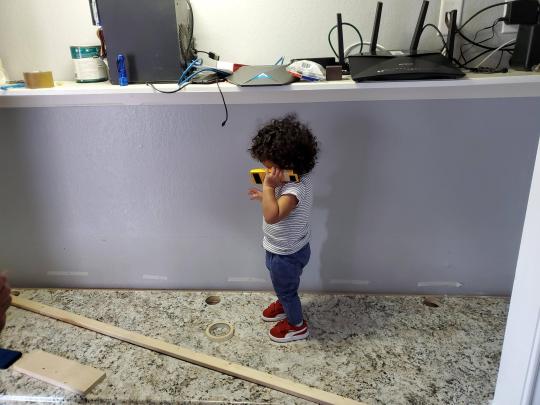
The holes allowed me to run cables under my desk much easier, I learned many of these techniques on Battlestations subreddit and Setup Wars on Youtube. My daughter was a good helper when it came to finding studs.
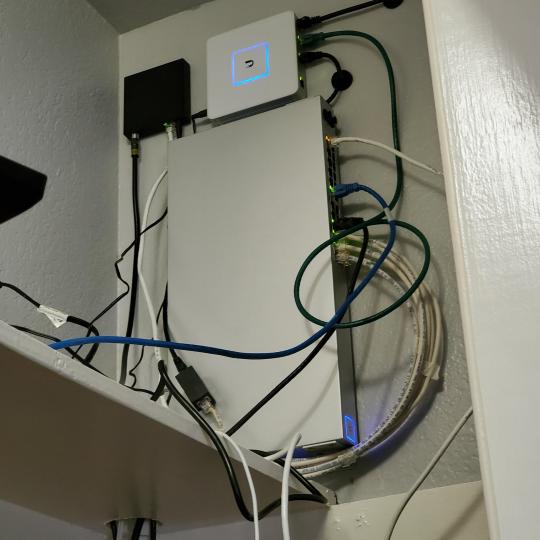
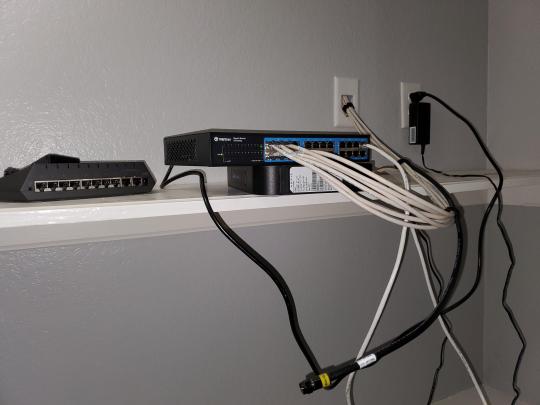
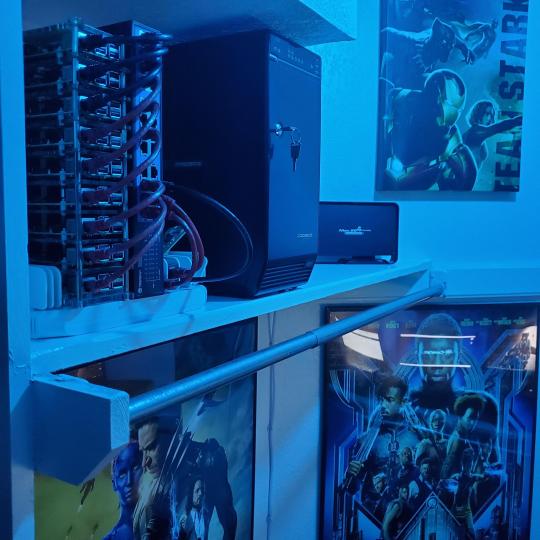
Some of my cousins are networking engineers, they advised me to go with Unifi devices. Here I mounted my Unifi 16 port switch, my Unifi Security Gateway (I'll try out pfSense sometime down the line), and my HD Homerun (big antenna is in the attic). I have Cat6 drops in each room in the house, so everything runs here. On my USG, I have both a LAN #2 and a LAN #1 line running to the 2nd closet in this room (server room). This shot is before the cable management.
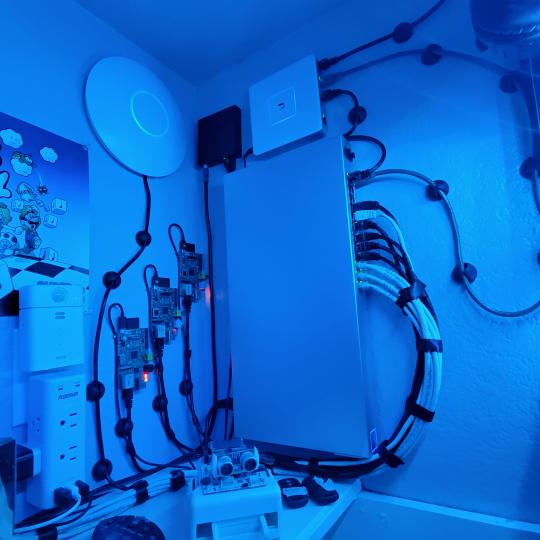
Cable management completed in closet #1. Added an access point and connected 3 old Raspberry Pi devices I had laying around (1 for PiHole - Adblocker, 1 for Unbound - Recursive DNS server, and 1 for Privoxy - Non Caching web proxy).
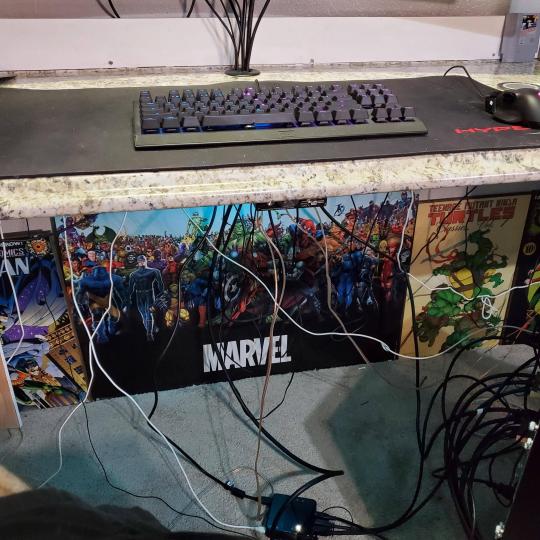
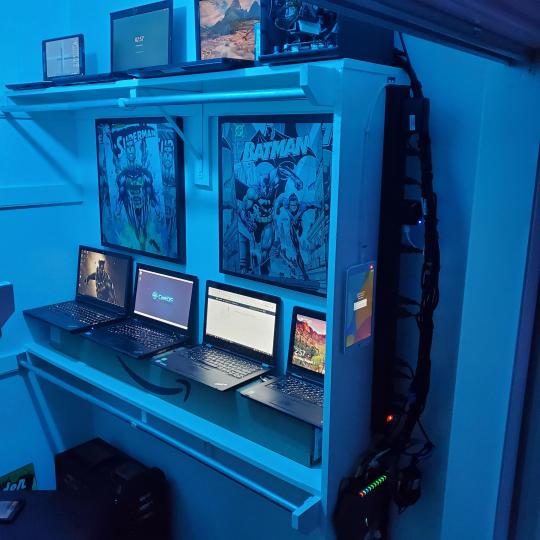
Rats nest of wires under my desk. I mounted an amplifier, optical DVD ROM drive, a USB hub that takes input from up to 4 computers (allows me to switch between servers in closet #2 with my USB mic, camera, keyboard, headset always functioning), and a small pull out drawer.
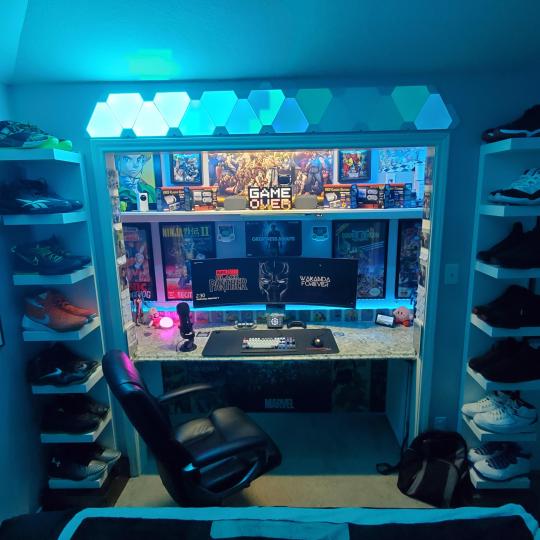
Cable management complete, night shot with with Nanoleaf wall lights. Unifi controller is mounted under the bookshelf, allows me to keep tabs on the network. I have a tablet on each side of the door frame (apps run on there that monitor my self hosted web services). I drilled a 3 inch hole on my desk to fit a grommet wireless phone charger. All my smart lights are either running on a schedule or turn on/off via an Alexa command. All of our smart devices across the house and outside, run on its on VLAN for segmentation purposes.
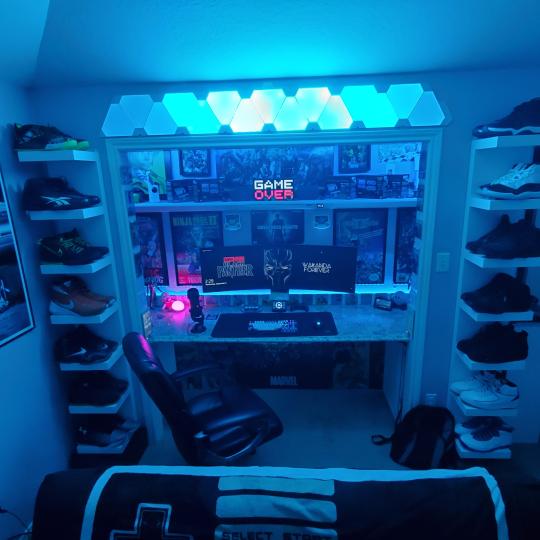
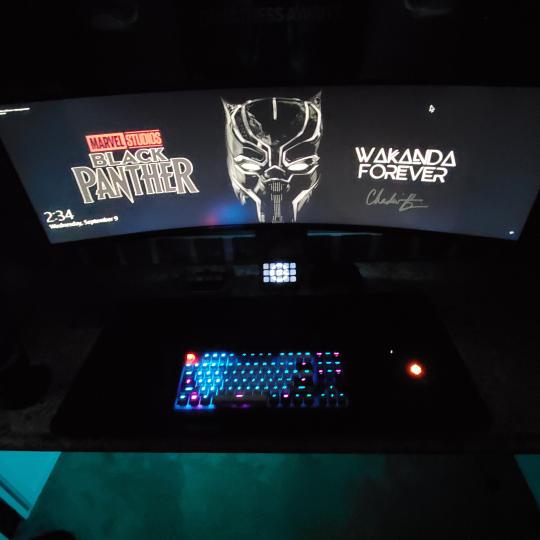
Quick shot with desk light off. I'm thinking in the future of doing a build that will mount to the wall (where "game over" is shown).
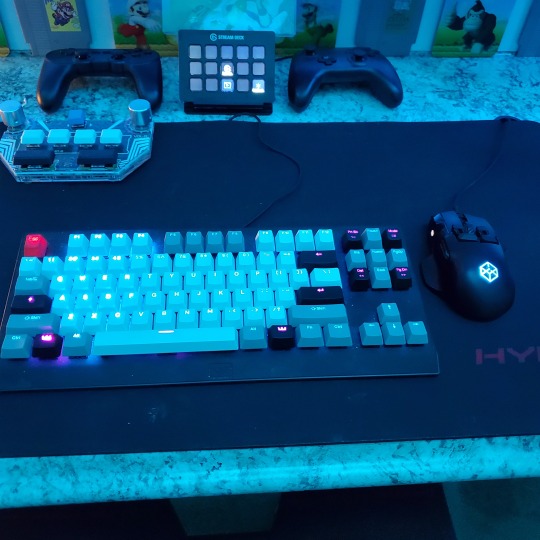
Wooting One keyboard with custom keycaps and Swiftpoint Z mouse, plus Stream Deck (I'm going to make a gaming comeback one day!).
Good wallpapers are hard to find with this resolution so pieced together my own.
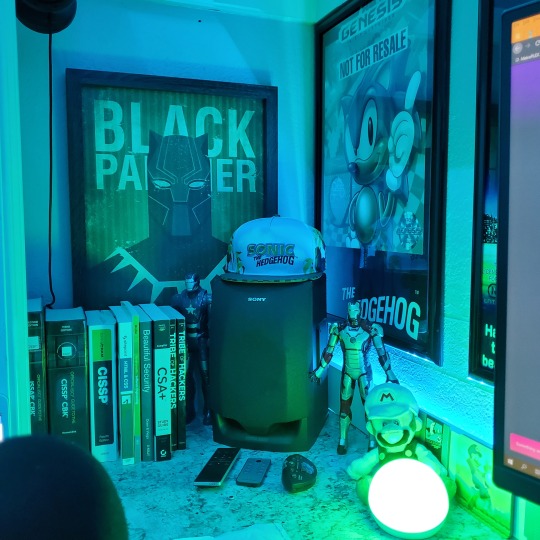
Speakers and books at inside corner of desk.
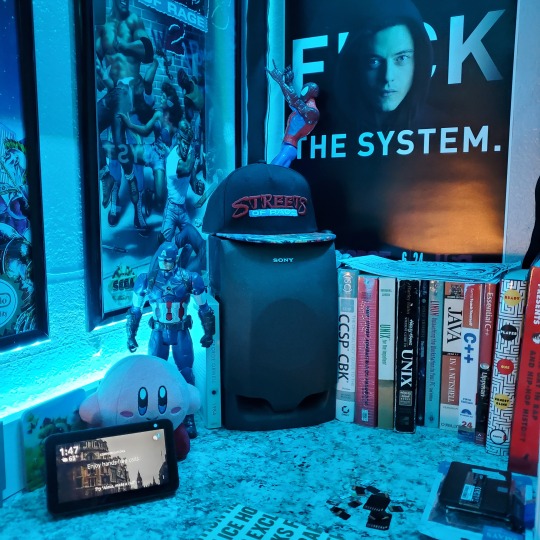
Speakers and books at inside corner of desk.
Closet #2, first look (this is in the same room but off to the other side). Ran a few CAT6 cables from closet #1, into the attic and dropped here (one on LAN #1, the other on LAN #2 for USG). Had to add electrical sockets as well.
I have owned a ton of Thinkpads since my IBM days, I figured I could test hooking them all up and having them all specialize in different functions (yes, I have a Proxmox box but it's a decommissioned HP Microserver on the top shelf which is getting repurposed with TrueNAS_core). If you're wondering what OSes run on these laptops: Windows 10, Ubuntu, CentOS, AntiX. All of these units are hardwired into my managed Netgear 10gigabit switch (only my servers on the floor have 10 gigabit NICs useful to pass data between the two). Power strip is also mounted on the right side, next to another tablet used for monitoring. These laptop screens are usually turned off.
Computing inventory in image:
Lenovo Yoga Y500, Lenovo Thinkpad T420, Lenovo Thinkpad T430s, Lenovo Thinkpad Yoga 12, Lenovo Thinkpad Yoga 14, Lenovo Thinkpad W541 (used to self host my webservices), Lenovo S10-3T, and HP Microserver N54L
Left side of closet #2
**moved these Pis and unmanaged switch to outside part of closet**
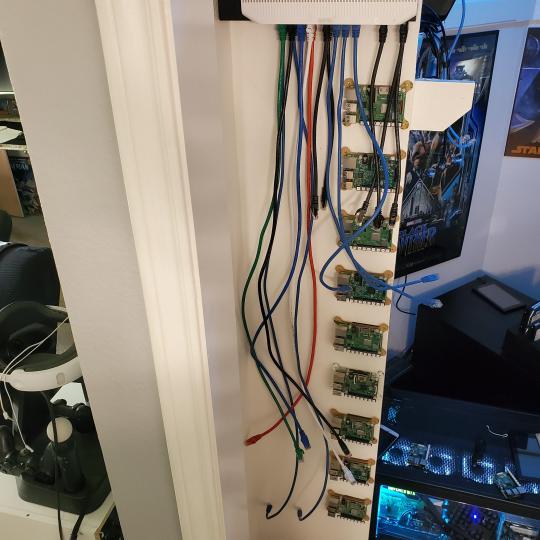
Since I have a bunch of Raspberry Pi 3s, I decided recently to get started with Kubernetes clusters (my time is limited but hoping to have everything going by the holidays 2020) via Rancher, headless. The next image will show the rest of the Pis but in total:
9x Raspberry Pi 3 and 2x Raspberry Pi 4
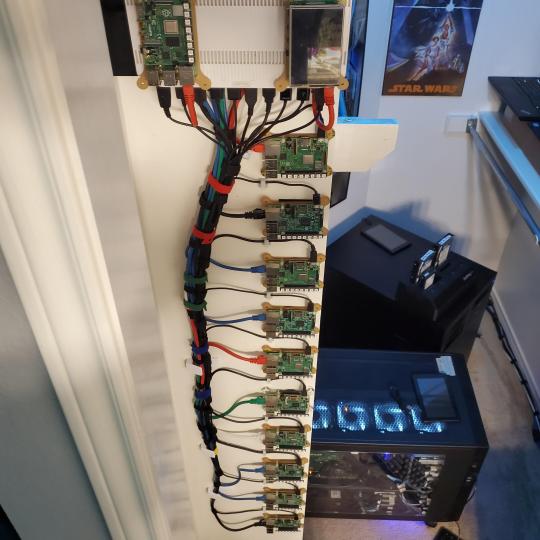
2nd shot with cable management. The idea is to get K3s going, there's Blinkt installed on each Pi, lights will indicate how many pods per node. The Pis are hardwired into a switch which is on LAN #2 (USG). I might also try out Docker Swarm simultaneously on my x86/x64 laptops. Here's my compose generic template (have to re-do the configs at a later data) but gives you an idea of the type of web services I am looking to run: https://gist.github.com/antoinesylvia/3af241cbfa1179ed7806d2cc1c67bd31
20 percent of my web services today run on Docker, the other 80 percent are native installs on Linux and or Windows. Looking to get that up to 90 percent by the summer of 2021.
Basic flow to call web services:
User <--> my.domain (Cloudflare 1st level) <--> (NGINX on-prem, using Auth_Request module with 2FA to unlock backend services) <--> App <--> DB.
If you ever need ideas for what apps to self-host: https://github.com/awesome-selfhosted/awesome-selfhosted
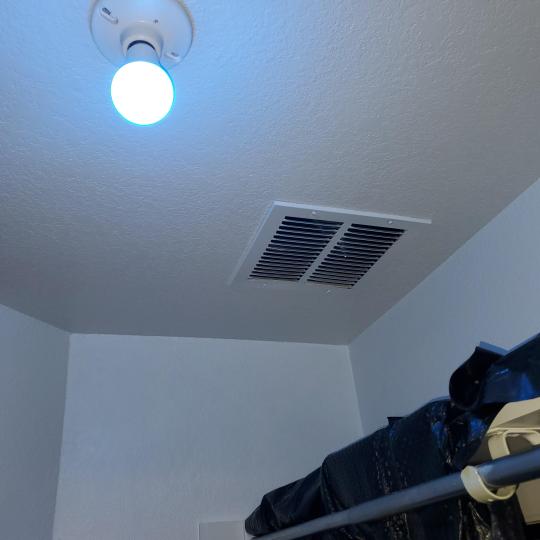
Homelabs get hot, so I had the HVAC folks to come out and install an exhaust in the ceiling and dampers in the attic.
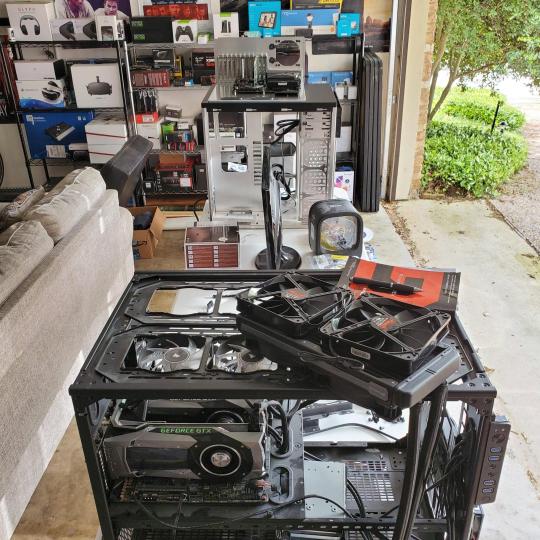
I built my servers in the garage this past winter/spring, a little each night when my daughter allowed me to. The SLI build is actually for Parsec (think of it as a self hosted Stadia but authentication servers are still controlled by a 3rd party), I had the GPUs for years and never really used them until now.
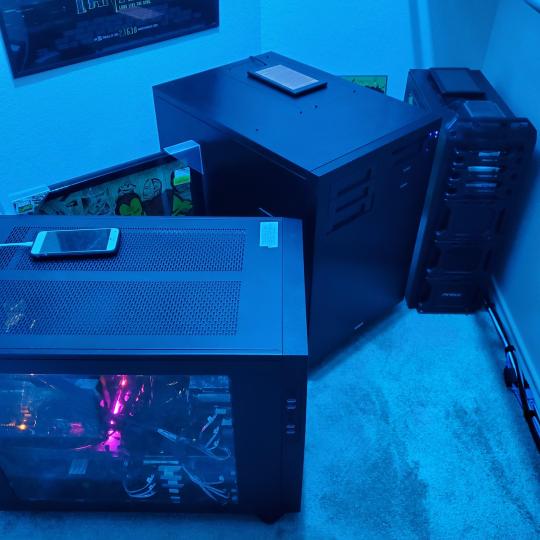
Completed image of my 2 recent builds and old build from 2011.
Retroplex (left machine) - Intel 6850 i7 (6 core, 12 thread), GTX 1080, and 96GB DDR4 RAM. Powers the gaming experience.
Metroplex (middle machine) - AMD Threadripper 1950x (16 core, 32 thread), p2000 GPU, 128GB DDR4 RAM.
HQ 2011 (right machine) - AMD Bulldozer 8150 (8 cores), generic GPU (just so it can boot), 32GB DDR3 RAM.
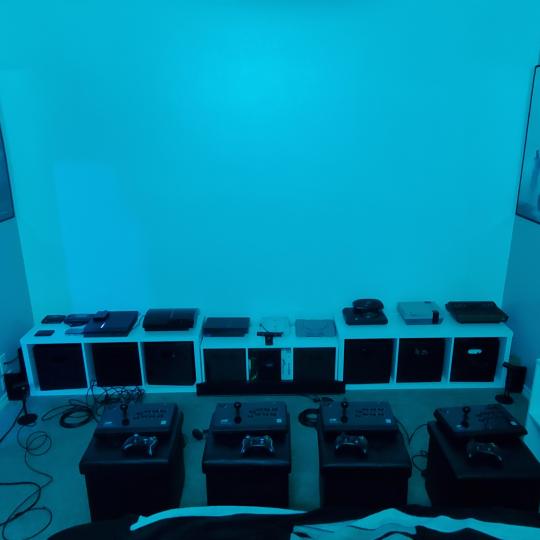
I've been working and labbing so much, I haven't even connected my projector or installed a TV since moving in here 11 months ago. I'm also looking to get some VR going, headset and sensors are connected to my gaming server in closet #2. Anyhow, you see all my PS4 and retro consoles I had growing up such as Atari 2600, NES, Sega Genesis/32X, PS1, Dreamcast, PS2, PS3 and Game Gear. The joysticks are for emulation projects, I use a Front End called AttractMode and script out my own themes (building out a digital history gaming museum).
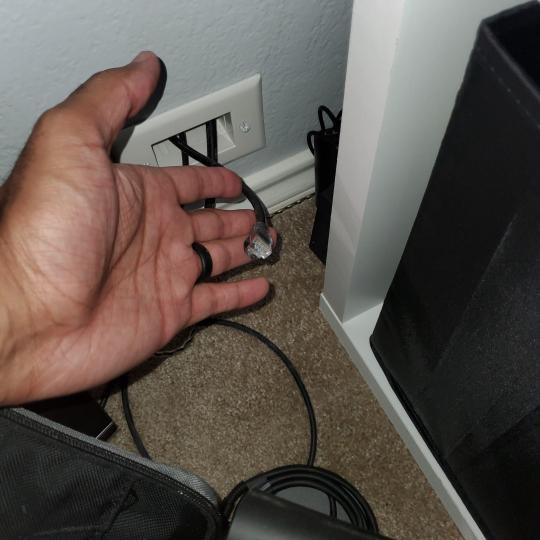
My longest CAT6 drop, from closet #1 to the opposite side of the room. Had to get in a very tight space in my attic to make this happen, I'm 6'8" for context. This allows me to connect this cord to my Unifi Flex Mini, so I can hardware my consoles (PS4, PS5 soon)
Homelab area includes a space for my daughter. She loves pressing power buttons on my servers on the floor, so I had to install decoy buttons and move the real buttons to the backside.
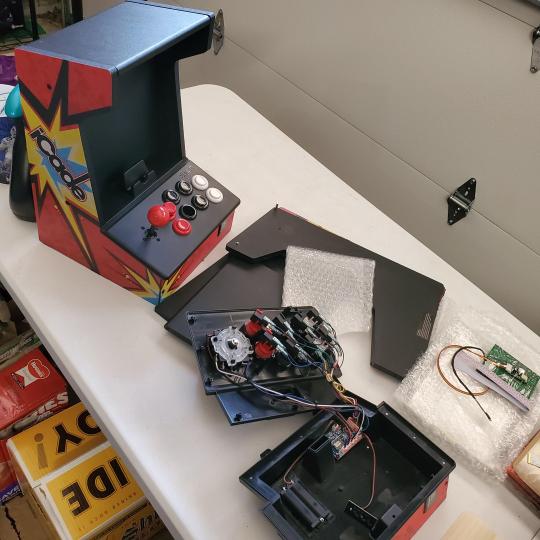
Next project, a bartop with a Raspberry Pi (Retropie project) which will be housed in an iCade shell, swapping out all the buttons. Always have tech projects going on. Small steps each day with limited time.
6 notes
·
View notes
Text
RetroPie 4.6 Launches With Raspberry Pi 4 Support
For fans of retro game consoles and home computer systems, it’s been a long time coming: RetroPie 4.6 has launched, with the star feature being official support for the Raspberry Pi 4. The RetroPie team took its time on purpose with this one and is still calling the support for the Pi 4 “beta,” although it’s now available for everyone and included within the 4.6 install. RetroPie says that “there are still things to improve, but most emulators now run well.”
RetroPie 4.6 also includes a move to Raspbian Buster as a base for the images, now that Raspberry Pi Trading Ltd. no longer supports Raspbian Stretch. RetroPie said it would continue to support Stretch for “a while longer,” but it will likely stop updating binaries for Stretch before the year is out.
Credit: Michael Henzler/CC BY-SA 4.0
Other changes include improvements to the RetroPie packaging system and core RetroPie-Setup code so that it remembers the package stage. RetroPie 4.6 will also only update those binaries where an actual new one is available, and it will no longer overwrite source installs during updates. RetroArch gets an update to 1.8.5 with a new notification system, support for “real CD-ROM” games with the ability to dump a disc image, an improved disk control system with the ability to label disks in .m3u files, and RetroAchievements support for the original PlayStation, Sega CD, and PCEngine CD.
Next up are changes for EmulationStation, which gets a bump here to version 2.9.1. It includes always-welcome Scraper fixes for TheGameDBNet, grid view and theme improvements, and new options to disable the system name on custom collections and to save gamelist metadata after each modification. RetroPie 4.6 also updates a slew of emulators to the latest versions, including those for the Commodore Amiga, Atari 2600, Atari 800 and 5200, and ScummVM, the awesome engine emulator for running old-school graphic adventure games from LucasArts and some other 1980s and 1990s studios.
youtube
The Raspberry Pi 4 promised to bring plenty of additional firepower to RetroPie. The popular $35 computer is capable of running not just the usual classic consoles and game systems, but even late 1990s and early 2000s powerhouses like the Sega Dreamcast (and redream is now bundled with RetroPie 4.6), as well as the PSP, Saturn, and to some extent even the PlayStation 2. The last few aren’t by any means perfect yet, but Dreamcast games have been running at around 60fps at 720p resolution for several months now, and enthusiasts are working on getting Dolphin up and running for GameCube and Wii titles.
Head over to RetroPie to download the latest 4.6 build.
Now read:
PCMag: How to Build a Raspberry Pi-Powered Retro Video Game Console
Raspberry Pi 4 Launches With More Powerful Processor and 4K Video
The $5 Raspberry Pi Zero Can Power Ventilators to Fight COVID-19
from ExtremeTechExtremeTech https://www.extremetech.com/gaming/309914-retropie-4-6-launches-with-raspberry-pi-4-support from Blogger http://componentplanet.blogspot.com/2020/04/retropie-46-launches-with-raspberry-pi.html
0 notes